Smartcard-based eID integration into OpenNCP
- Joao Cunha
Table of Contents
1. Introduction
In this page we'll present how the smartcard-based eID building block developed by the e-SENS project is deployed and integrated into the OpenNCP framework. The eID component is used in the identification and authentication of the patient at the PoC. To be able to take advantage of it, the patient must be holder of a card that identifies him in his country of origin and the physician's PoC must be equipped with a card reader.
The smartcard-based eID includes the following e-SENS eID levels:
| Level | Name | Functions and Description |
|---|---|---|
1 | Local Attribute Retrieval and Mapping Service (LARMS) |
|
2 | Local Authentication Modules (LAM) |
|
3 | Local Authentication Modules and DSS (LAM+) |
|
Level 0 is considered the default one where manual input of patient identifiers is needed. Description of the different levels can also be found in the eID Task Force meeting minutes. Specific documentation about the eID building block will be handed over by e-SENS to the CEF eHealth DSI by the end of the e-SENS project (March 2017).
From now on, every reference to eID component shall be understood as a reference to the smartcard-based eID component.
2. Technical description of the eID workflow
The eID component is a Java Web Start application that automatically installs and runs in the physician's PoC and is able to interact with and process information from a set of relevant smartcards. The OpenNCP Portal is the component responsible for interacting with the eID component. After selecting the country of the patient in the Portal, the physician will find a link to download the eID component and automatically run it using the Java WS installation of the PoC. After that, the physician can use the PoC's card reader to start using the card's facilities in conjunction with the Portal. And how does this happen?
2.1. Read freely accessible patient data from smartcard (LARMS)
Every country that wishes to allow their citizens to be identified by the eID component in a foreign PoC should first change their search mask in order to map their identifiers to a set of defined friendly names (attributes):
- cardIssuerCountry
cardType
- cardId
healthInsuranceId
- healthInsuranceCompanyId
- healthInsuranceCompanyName
- givenName
surname
dateOfBirth
gender
fiscalNumber
socialSecurityNumber
civilianIdNumber
- ehicValidity
- ehicBenefactor
- fullAddress
issueDate
terminationDate
photo
The different identifiers that can be retrieved from the different cards can be checked in the source code under open-ecard/addons/larms/src/main/resources/*.vm.
So, for instance, in the case of Austria, it's needed to map its 3 mandatory identifiers (patient ID, given name, surname) to their corresponding friendly names, by appending the friendlyName XML attribute to the specific XML element, with the appropriate value, e.g.:
<patientSearch>
   <!-- min and max -1 means no length check -->
   <!-- id format="LLLLLLNNLNNLNNNL" means 'L'etter 'N'umber -->
   <!-- validation contains the fields which are mandatory -->
   <!-- more then one validation means or -->
   <!-- only one input field no validation necessary because minimum value which has to be filled out is 1 -->
   <country code="AT">
      <searchFields>
         <textField label="patient.data.surname" min="3" max="-1" dtoIndex="1" friendlyName="surname"/>
         <textField label="patient.data.givenname" min="3" max="-1" dtoIndex="2" friendlyName="givenName"/>
         <birthDate label="patient.data.birth.date" min="-1" max="-1"/>
         <id label="patient.search.patient.id" min="-1" max="-1" domain="2.16.17.710.780.1000.990.1" friendlyName="healthInsuranceId"/>
      </searchFields>
      <validation>
         <field label="patient.data.surname" />
      </validation>
      <validation>
         <field label="patient.data.givenname" />
      </validation>
   </country>
</patientSearch>
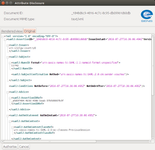
This information of the search mask is then mapped into the service.SearchMask, model.Identifier and service.Demographics classes by means of EpsosHelperService's getCountry*/getCountries* methods, which will provide that data to be stored in MyBean. When the physician selects the flag of the patient's country in the Portal, it is displayed a representation of that country's search mask (view1.xhtml).
<h:form prependId="false" id="searchPatient">
	<h3>#{msg['ui.searchmask.info']}</h3>
    	<h:panelGrid columns="2" >
        	<c:forEach items="#{myBean.identifiers}" var="identifier" varStatus="idLoop">
            	<h:outputLabel value="#{identifier.key}"/>
                <p:inputText id="#{not empty identifier.friendlyName ? identifier.friendlyName : ''.concat('uservalue-').concat(idLoop.index)}" value="#{identifier.userValue}" required="true"/>
            </c:forEach>
            <c:forEach items="#{myBean.demographics}" var="demographic" varStatus="demographicsLoop">
            	<h:outputLabel value="#{demographic.label}:" rendered="#{myBean.showDemographics}"/>
                <c:choose>
                	<c:when test="#{demographic.type=='text'}">
                    	<p:inputText id="#{not empty demographic.friendlyName ? demographic.friendlyName : ''.concat('userValue2-').concat(demographicsLoop.index)}"
                            value="#{demographic.userValue}" required="#{demographic.mandatory}"/>
                    </c:when>
                    <c:when test="#{demographic.type=='calendar'}">
                    	<p:calendar id="#{not empty demographic.friendlyName ? demographic.friendlyName : ''.concat('userDateValue2-').concat(demographicsLoop.index)}"
                        	  value="#{demographic.userDateValue}" yearRange="c-100:c+0" pattern="yyyyMMdd" navigator="true" >
                            <f:convertDateTime pattern="yyyyMMdd"/>
                        </p:calendar>
                     </c:when>
                 </c:choose>
             </c:forEach>
         </h:panelGrid>
         <a id="sc_link" target="_blank" href="/jnlp/openecard.jnlp">#{msg['patient.search.downloadeid']}</a>
...
The main difference with countries supporting eID for their citizens is that the id attribute of the input fields is assigned the value of the friendlyName attribute in the XML of the search mask (explanation of how the previous snippet of code works can be found here).
After displaying the page, a Javascript polling mechanism starts (code at the end of view1.xhtml). Each 10 seconds, it tries to reach the Java WS application by calling a REST web service that returns the freely accessible data from the smartcard. The eID component exposes its web services under the hostname www.localhost-ecard-client.de, port 24727. For instance, the LARMS service is exposed under /larms/getAttributes:
http://www.localhost-ecard-client.de:24727/larms/getAttributes?servicelevel=basic&format=JWT
When it succeeds in calling the eID component through this web service, the polling stops and it retrieves a Base64-encoded JSON Web Token (JWT) with the following format:
header.body.
After decoding the body, it's able to retrieve the whole set (or a subset, depending on the card specificities) of the attributes previously listed, by looking for their namespaces, which are:
{"sub":"card_holder",
"iss":"https://www.localhost-ecard-client.de:24728/larms/getAttributes",
"iat":"2016-07-26 16:03:41.794",
"jti":"a5b7d66e-99cf-4b37-a422-41fae3e999fc",
"http://www.esens.eu/attributes/smartcard/CardIssuerCountry":"pt",
"http://www.esens.eu/attributes/smartcard/CardType":"pt-cdc",
"http://www.esens.eu/attributes/smartcard/HealthInsuranceId":{"urn:oid:1.2.3.4.5.6.7.8.10":"898765368"},
"http://eidas.europa.eu/attributes/naturalperson/CurrentFamilyName":"Valido Emv Cap",
"http://eidas.europa.eu/attributes/naturalperson/CurrentGivenName":"Ricardo",
"http://eidas.europa.eu/attributes/naturalperson/DateOfBirth":"1975-12-01",
"http://eidas.europa.eu/attributes/naturalperson/Gender":"M",
"http://www.esens.eu/attributes/smartcard/FiscalNumber":"399990070",
"http://www.esens.eu/attributes/smartcard/SocialSecurityNumber":"11999999936",
"http://www.esens.eu/attributes/smartcard/CivilianIdNumber":"990009050",
"http://www.esens.eu/attributes/smartcard/IssueDate":"2014-02-06",
"http://www.esens.eu/attributes/smartcard/TerminationDate":"2019-02-06",
"http://www.esens.eu/attributes/smartcard/Photo":"data:image/jp2;base64,AA..."}
Then, it finds the page's input elements with id attribute equals to the friendly names and sets them with the equivalent attributes read from the card, e.g.:
$("input[id = '<portlet:namespace/>:fiscalNumber']").val(payload['http://www.esens.eu/attributes/smartcard/FiscalNumber']).attr("readonly", true);
In the end of the polling cycle, the search mask is shown filled with the attributes read from the card (the input fields get disabled to prevent the physician from changing the values) and the physician is able to proceed with the usual patient demographics query. The end of this first workflow marks the end of the eID level 1 functionalities (LARMS).
2.2. Patient Authentication (LAM/LAM+)
After successfully performing the patient demographics query and proceeding to the next page, the physician has to request the list of documents (either Patient Summaries (PS) or ePrescriptions (eP)). For that request, a TRC Assertion is needed (TRCA). In the default scenario, the physician requests the TRCA to be generated without the intervention of the patient (i.e., it'll be signed with the NCP-B signature certificate). In a eID level 2 or 3 scenario, the physician needs to request the patient to introduce his authentication PIN code in order to give access to protected data of his smartcard (to sign the TRCA with the patient's smartcard qualified certificate). Hence, signing of the patient's consent is possible. For this purpose, a new button was added in this page (viewPatientConfirmation.xhtml for PS; viewPatientConfirmationForDocuments.xhtml for eP):
<p:commandButton id="submitLAM"
      value="#{msg['trca.confirm.lam']}"
      ajax="true"
      onclick="requestTRCA('#{facesContext.externalContext.remoteUser}', '#{myBean.selectedPatient.extension}', '#{myBean.selectedPatient.root}', '#{myBean.hcpAssertion.ID}')">
      <p:resetInput target="confirmationPanel" />
</p:commandButton>
When this button is clicked, a piece of Javascript code is executed (located at the end of those 2 XHTML files). It gets the following data:
- User ID (e.g., doctor ID);
- Patient ID (format: patientID&patientRoot&ISO);
- Identity Assertion ID;
- Purpose of use;
And calls the /trc/rst REST web service exposed by the eID component, e.g.:
http://www.localhost-ecard-client.de:24727/trc/rst?doctorId=11906&patientId=898765368&2.16.17.710.820.1000.990.1&ISO&idaRef=_1f08ed21-0b0b-46b0-801c-af106fb4fa4f&purpose=EMERGENCY
This service will do 4 main things:
- Invoking TRC-STS eID SOAP web service in order to obtain an unsigned TRCA;
- Display to the user the attributes to be signed;
- Request the smartcard to sign the TRCA with its certificate;
- Request the user to introduce his authentication PIN code in order to disclose access to the cryptographic material of the card and sign the TRCA.
By the end of this workflow, a card-signed TRCA is returned and injected into the Portal session by means of MyBean.setSignedTRC method. The document list request can then proceed.
3. Deployment
In order to provide eID functionality in the Point-of-Care (PoC) and run the Java WS application, you'll need to access its JNLP file (through a clickable link). As such, you'll need to deploy a jnlp folder to your Liferay's tomcat-X.Y.ZZ/webapps folder. This folder should have the following content:
/jnlp
	|-- /img
		|-- openecard-default.png
		|-- openecard-shortcut-linux.png
		|-- openecard-shortcut-mac.icns
		|-- openecard-shortcut-win.ico
		+-- openecard-splash.png
	|-- richclient-X.Y.Z.jar
	+-- openecard.jnlp
In each new version of the eID artifacts, the contents of the folder should be updated (the most important ones being the JAR file and the JNLP file). The JNLP folder content can be found in OpenNCP Bitbucket.
You'll need to edit the JNLP file (openecard.jnlp) in order to point it to the location of the deployed JNLP folder:
<jnlp version="2015-11-24" codebase="http://<LIFERAY_IP_ADDRESS>:<LIFERAY_PORT>/jnlp" href="openecard.jnlp" spec="1.6+">
LIFERAY_IP_ADDRESS should be replaced by the IP address of the machine running Liferay's Tomcat. Note: use exactly the IP address and not "localhost", because if you're running the PoC's browser in a different machine it'll make a request to download the JNLP file from "http://localhost/..." and it won't find it.
LIFERAY_PORT: should be replaced by the port where Liferay's Tomcat is listening (the port used for the HTTP Connector in Liferay's server.xml, identified as YYYY in the first steps of this page).
Since the folder is located directly under Tomcat's webapps, it can be easily located by "/jnlp".
Don't forget to update your search mask according to the instructions in section 2.1 of this page.
In the case your PoC is connected to the network via a proxy, you'll need to add the hostname where the eID component exposes its services (www.localhost-ecard-client.de) to the browser proxy exceptions.
Since this is a Java WS application, the following commands may be useful:
# Open Java WS cache viewer
$ javaws -viewer

# Clean Java WS cache (forcing to redownload the eID component from the server upon clicking its download link in the Portal)
javaws -uninstall
The eID component configurations and logs are stored under ~/.openecard:
~/.openecard
	|-- /addons
		|-- /conf
			|-- /LARMS
				+-- LARMS.conf
	|-- /logs
		+-- richclient_info.log
	|-- openecard.properties
	+-- richclient_logback.xml
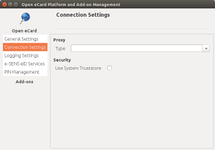
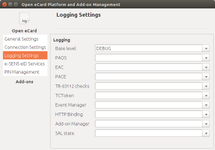
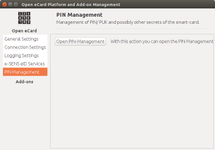
The configuration panel of the eID component (section 4) is a useful GUI to help defining some relevant settings:
- Logging Settings;
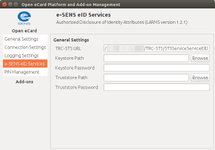
- e-SENS eID Services
- TRC-STS eID URL (e.g., http://<ncp_ip_address>:<ncp_port>/TRC-STS/STSServiceServiceEID, where <ncp_ip_address>:<ncp_port> are the IP address and port of the machine/tomcat running TRC-STS and the path "/TRC-STS" should match the name of the deployed TRC-STS artifact). Notice that this service doesn't expose a WSDL. If connection to the TRC-STS service is made through HTTPS, then a keystore and/or a truststore need to be defined along with the corresponding passwords.
The eID component works with both Oracle's Java WS and OpenJDK IcedTea.
Supported cards
Currently, eID only works for smart cards from the following countries: Austria, Italy, Portugal, Luxembourg, Germany, Greece, Belgium and Estonia. In order to electronically identify a patient from any other country, that country must provide sample cards to the community first, so that OpenNCP can be enhanced.
If you wish to obtain information about your equipped card reader and inserted card, you can use the command-line utility opensc-tool or use the national application that your card issuer makes available (in case it exists).
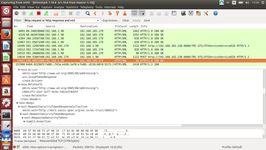
If you wish to find the RST (RequestSecurityToken) and RSTRC (RequestSecurityTokenResponseCollection) messages sent to/from the TRC-STS eID service for obtaining the unsigned TRCA (needed for eID tests during CATs), you'll need to use a network sniffer, e.g., Wireshark, and listen to HTTP/XML protocol messages (filter: http.request or http.response and xml) sent over the network interface you're using (usually, eth0 if you're running the PoC and OpenNCP in different machines, or loopback if they're in the same). RST can be found in the HTTP POST request to the /TRC-STS/STSServiceServiceEID and RSTRC in the response received right after (HTTP 200 OK). This procedure is depicted in the image below:
4. User interface
4.1. eID component configuration panel
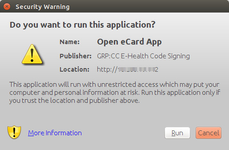
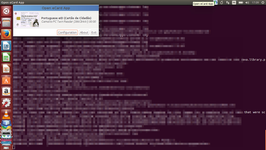
The following screenshots show:
- The dialog prompting the user to trust the eID component digitally signed by GRP:CC E-Health Code Signing;
- The eID component correctly recognizing a Portuguese citizen card and a card reader.
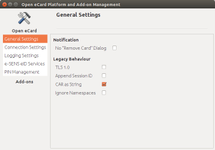
Also, a set of screenshots showing the different menus of the eID component configuration panel.
| General Settings | Connection Settings | Logging Settings |
|
|
|
| e-SENS eID Services | PIN Management | About |
|
|
|
4.2. Video-demonstration (LARMS)
Following is a video demonstration of eID level 1 (LARMS) integrated into the Portuguese International Portal:
This second video shows the typical PS workflow using LARMS in the Austrian Portal:
4.3. PS workflow with eID level 3 (LAM+)
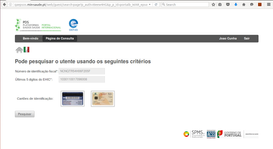
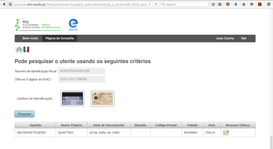
The following screenshots show the PS workflow using the Portuguese International Portal taking advantage of eID level 3 capabilities to identify and authenticate an Italian patient:
| 2. Search mask filled by LARMS | 3. Successful XCPD query |
|
|
|
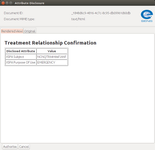
| 4. Requesting documents list using LAM+ | 5. Attribute disclosure window (TRCA) | 6. Unsigned TRCA |
|
|
|
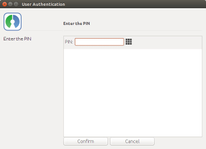
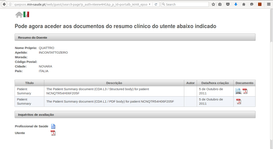
| 7. Authentication PIN code window | 8. Documents list successfully retrieved | |
|
|


5. Known issues / Challenges ahead
This section presents the main issues and challenges that this eID component is facing (apart from the bugs that are reported and being followed in OpenNCP Jira).
According to the eID meeting of June 7th:
- (not discussed in TelCo, added for clarity by soeren) the eHealth eID components are comprised of a core, the OASIS DSS signature addon, and the AuthN addons LARMS and LAM.
- The DSS service is based on SD-DSS and has been extended to support more signatures and signature placements. Fully available as source code.
- LARMS and LAM are fully available as source code.
- It is, however, currently inadvisable to publish the source code of the eID core alongside with the OpenNCP as the unchanged binary version carries a certification towards BSI TR-03124. Unintended or uncovered changes may invalidate the certification. There is a need for strict governance on this matter. The source code is naturally available through e-SENS WP 5.2.1.
Soeren Bittins clarification about this topic:
The most current version is always available here: http://jnlp.fokus.fraunhofer.de/ Source code as well as annotated test versions are available here: https://owncloud.fokus.fraunhofer.de/index.php/s/AjBPdStQh7tqvPv We have requested an e-SENS home for this to untangle the dependency on FhG services (we sometimes need to take servers or docker containers offline for maintenance). Using the OpenNCP facilities is a good temporary measure but as discussed in Lisbon, the e-SENS MB is not entirely sure about the stakeholder status of the OpenNCP.
Code management is currently indeed an issue:
- the adapted version of SD-DSS supporting all eID signature requirements of the e-SENS domains is still not evaluated or approved by CEF eSignature,
- the core of the framework is certified but sheds this certification as soon as someone incorporates changes and it's difficult to determine the state
- no official e-SENS or eHealth DSI code signature facilities are available for signing the code after changes (we're still relying on the FhG code signing certificates) but code MUST be properly signed to be used with JWS
- the eCard core is still licenses as GPLv3, any inconsiderate changes might bleed proprietary IPR into the framework; thus invalidate our careful licensing model leveraging upon the ASL for all e-SENS-specific additions
In any case, all source code of all modules as well as the core framework are available as one source package to all members of WP5.2 and WP6 on the gitlab. In preparation of the eHealth DSI, this is opened to the complete OpenNCP Team for facilitating integration.