- Download this Liferay version from here (the related Liferay version is 6.2.5 CE GA6);
- Populate the database using the scripts that can be found here. Use the files located in folder "create". Note that the database name in the scripts ('lportal') differs from the one shown in the properties file shown in step 4 ('lp62'), but they refer to the same database. Choose the one you like the most;
Change Liferay's Tomcat ports to others different than the ones you're using in your OpenNCP Tomcat (the chosen ports should be available too):
server.xml
<Server port="XXXX" shutdown="SHUTDOWN">
<Connector port="YYYY" protocol="HTTP/1.1"
connectionTimeout="20000"
redirectPort="ZZZZ" URIEncoding="UTF-8" /><Connector port="WWWW" protocol="AJP/1.3" redirectPort="ZZZZ" URIEncoding="UTF-8" />
Create portal-ext.properties under Liferay folder and add the following options (adjust the DB connection to your scenario):
# # MySQL (You can configure any other database by providing the appropriate settings)
jdbc.default.driverClassName=com.mysql.jdbc.Driver
jdbc.default.url=jdbc:mysql://localhost/lp62?useUnicode=true&characterEncoding=UTF-8&useFastDateParsing=false
jdbc.default.username=<username>
jdbc.default.password=<password>
# EPSOS ROLES (These roles will be created by default on OpenNCP Portal startup)
system.roles=Doctor,Pharmacist,Patient,Nurse
system.role.Doctor.description=Doctor Role
system.role.Pharmacist.description=Pharmacist Role
system.role.Patient.description=Patient Role
system.role.Nurse.description=Nurse roleAdd the following properties to your $EPSOS_PROPS_PATH/tsam.properties (connection to your TSAM/LTR database):
tsam.properties
## Required for OpenNCP Portal
ltr.db.url=jdbc:mysql://hostname:3306/database?useUnicode=true&characterEncoding=UTF-8
ltr.db.user=username
ltr.db.password=password
ltr.db.driverClass=com.mysql.jdbc.Driver- In your Liferay's Tomcat, add to /conf/context.xml the same JNDI resources that you defined in your OpenNCP's Tomcat;
- It is advisable to give enough memory space for the OpenNCP Portal to render the CDA documents. That can be defined in your Liferay's Tomcat /bin/setenv.sh, by setting -XX:MaxPermSize=1024m.
- Start Liferay's Tomcat in order to create the deploy folder (zip file doesn't have it due to being an empty folder);
- Open "http://<hostname>:<YYYY>" in a web-browser and follow the setup wizard to create the default users and other data in the database;
- <hostname> can be a hostname or an IP address;
- <YYYY> is the port with value "YYYY" defined in step 3.
- Then download the latest artifacts from Joinup and install them in OpenNCP Portal:
- Remove the epsosportal folder from webapps (rm -rf epsosportal). In a fresh install this folder will not exist;
- Copy the WAR files to the "deploy" folder placed under Liferay's directory.
Building OpenNCP Portal
If you want to build your own OpenNCP Portal you have to alter the settings of maven according to the servers configuration:
<server>
<username>reader</username>
<password><ask for password></password>
<id>gnomon-lib-snapshot</id>
</server>
<server>
<username>reader</username>
<password><ask for password></password>
<id>gnomon-lib-release</id>
</server>
Configure HCER.PROPERTIES
If you want to use the functionality of the HCER database (used by Trillium) you have to:
Create "hcer" database and use the following script to create its table structure:
CREATE TABLE IF NOT EXISTS `hcerdocs` (
  `documentbody` text NOT NULL,
  `creationDate` datetime DEFAULT NULL,
  `creator` varchar(255) DEFAULT NULL,
  `patient` varchar(255) DEFAULT NULL,
  `fromcountry` varchar(20) DEFAULT NULL,
  `docid` bigint(20) NOT NULL AUTO_INCREMENT,
  PRIMARY KEY (`docid`)
) ENGINE=InnoDB DEFAULT CHARSET=utf8 AUTO_INCREMENT=1 ;
- Set the connection properties in your $EPSOS_PROPS_PATH/hcer.properties:
jdbc.default.driverClassName=com.mysql.jdbc.Driver
jdbc.default.url=jdbc:mysql://localhost:3306/hcer?useUnicode=true&characterEncoding=UTF-8&useFastDateParsing=false
jdbc.default.username=<username>
jdbc.default.password=<password>
Adding eID functionality
In order to provide eID functionality in the Point-of-Care (PoC), add the jnlp folder to your Liferay's tomcat-X.Y.ZZ/webapps folder. This folder should have the following content:
/jnlp
	|-- /img
		|-- openecard-default.png
		|-- openecard-shortcut-linux.png
		|-- openecard-shortcut-mac.icns
		|-- openecard-shortcut-win.ico
		+-- openecard-splash.png
	|-- richclient-X.Y.Z.jar
	+-- openecard.jnlp
In each new version of the eID artifacts, the contents of the folder should be updated (the most important ones being the JAR file and the JNLP file). The JAR file can be found in Joinup (section 3.1 of the installation manual page). The JNLP can only be found in OpenNCP Bitbucket. You can download the folder contents here:
You'll need to edit the JNLP file in order to point it to the location of the deployed JNLP folder:
<jnlp version="2015-11-24" codebase="http://<LIFERAY_IP_ADDRESS>:<LIFERAY_PORT>/jnlp" href="openecard.jnlp" spec="1.6+">
LIFERAY_IP_ADDRESS should be replaced by the IP address of the machine running Liferay's Tomcat. Note: use exactly the IP address and not "localhost", because if you're running the PoC's browser in a different machine it'll make a request to download the JNLP file from "http://localhost/..." and it won't find it.
LIFERAY_PORT: should be replaced by the port where Liferay's Tomcat is listening (the port identified as YYYY in the first steps of this page).
Since the folder is located directly under Tomcat's webapps, it can be easily located by "/jnlp".
Countries providing eID capabilities for their patients at the country of treatment must update their InternationalSearchMask file to add the friendlyName attribute to the <id> tag(s) of the search fields (you can check the example file from Portugal, InternationalSearch_PT.xml, in epsos-configuration/forms folder). The complete list of values for this attribute is as follows (an example from eID level 1 source code can be seen here):
- cardIssuerCountry
cardType
healthInsuranceId
surname
givenName
dateOfBirth
gender
fiscalNumber
socialSecurityNumber
civilianIdNumber
issueDate
terminationDate
photo
Currently, eID only works for smart cards from the following countries: Portugal, Luxembourg, Italy, Greece, Austria and Spain. In order to electronically identify a patient from any other country, that country must provide sample cards to the community first, so that OpenNCP can be enhanced.
Requirements
In order to run the eID client you'll need to have Oracle's Java WS installed. It doesn't work with OpenJDK IcedTea.
Following is a video demonstration of eID level 1:
Post Install Configuration
You have to login as admin (test@liferay.com with password test) and then do the following actions:
- Login with administration rights (test@liferay.com/test)
- Change your admin password for security reasons
- Add a new page in your portal by clicking in the plus icon in the left up corner

- Then it will appear the following screen
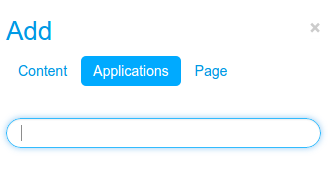
- You have first to select "Page", add a name to your new page (e.g. epsos services), and select the layout "1 Column"
- Then you have to click on the menu this newly created page and click again on the plus icon in order to add in this new page the application for epsos services. So do add application -> portalb and the portlet for epsosServices will appear in your screen
Logout from Portal
In case you're wondering how to logout from Portal, you need to paste this specific URL in the browser: http://<hostname>:<port>/c/portal/logout